
Create Test System
Sign in (as Tester or Org Rep) and click on the New Test System link in the top menu:

To select whether your Test System is an HL7-FHIR, CDS Hooks, HL7-V2, HL7-V3 test system, select the correct option under Spec Domain. To enable selection of your test system as the Destination (or ‘target’) of message exchanges in Test Setup, select the
Serveroption for Profiles Supported: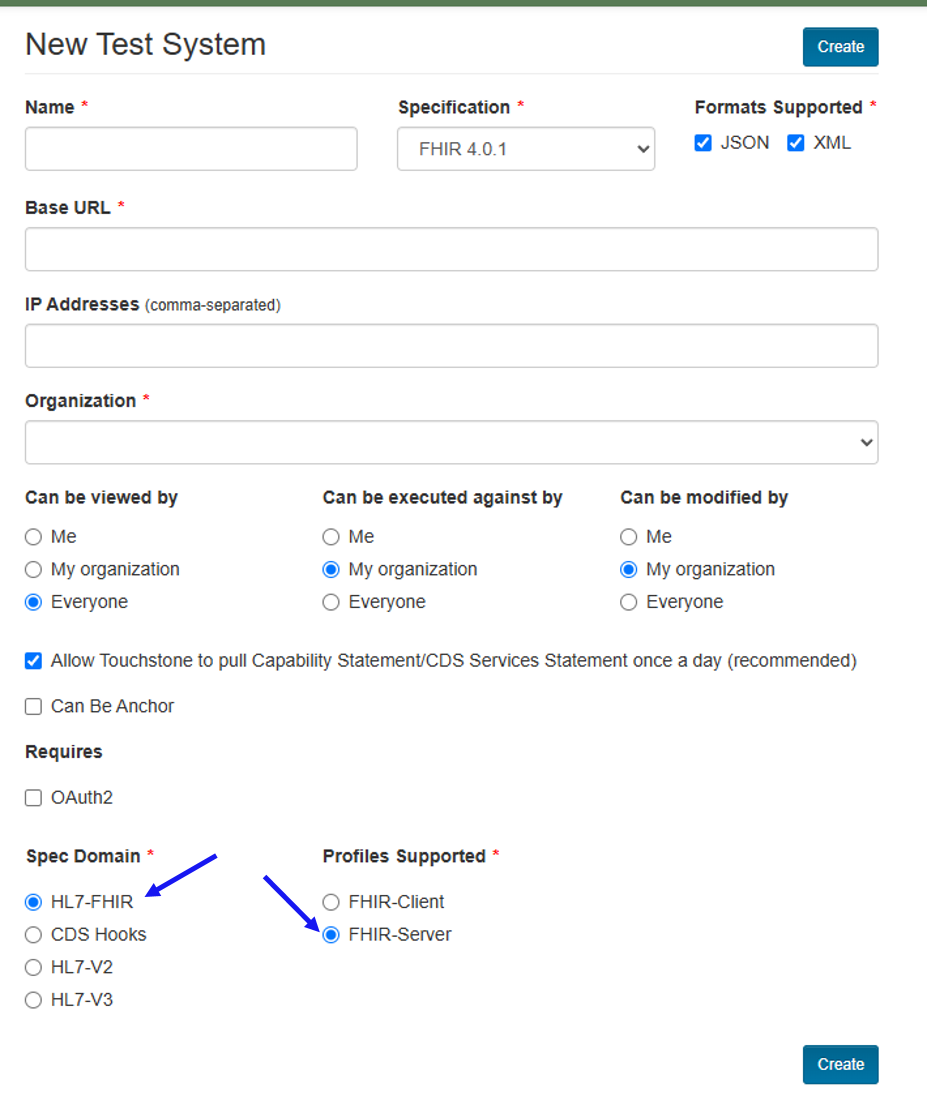
If you select either
HL7-V2orHL7-V3as your Spec Domain, then you will have a new option appear for Message Protocols: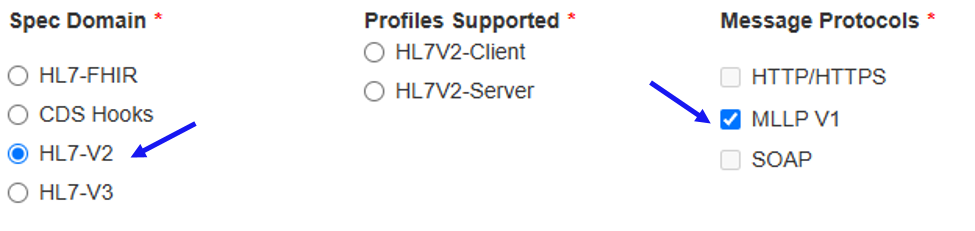
Note
You do not need to include your organization name in the test system name. Touchstone prefixes the test system name with your organization name where necessary.
Name – This will be displayed along with your Organization name in Test System select-boxes in Touchstone.
Base URL – Must be reachable on the public internet. Refer to Service Base URL for details. Base URL is limited to 512 characters. For a
HL7V2-Server, the Base URL should be in the form ofhostname:port.IP Addresses – This will be populated automatically by Touchstone. You can add additional IP addresses for the test system if the auto-detected one is incorrect. Note that the IP address is used primarily for Client test systems. As such it can be ignored if your system only responds to request and does not initiate message exchanges to other test systems.
Can be viewed by – If
MeorMy Organizationis selected, then test system will not be listed on the Test Systems screen for users outside your organization. IfMeis selected, then even other users within your organization will be unable to see the test system.Can be executed against by – If
MeorMy Organizationis selected, then users outside your organization cannot execute tests against the test system. IfMeis selected, then even other users within your organization will be unable to execute tests against the test system.Can be modified by – If
MeorMy Organizationis selected, then users outside your organization cannot modify this test system’s attributes in Touchstone. IfMeis selected, then even other users within your organization will be unable to modify attributes of this test system.Allow Touchstone to pull capability statement once a day – Touchstone conditionally evaluates assertions during test execution based on test system capabilities as defined by its Capability Statement. To ensure that Touchstone has the latest copy of your Capability Statement, allow Touchstone to download this statement from your server once a day (by checking this box) and ensure that your test system has the statement available.
Can Be Anchor – Whether or not this test system can serve as an Anchor System in conformance suites. Conformance results are NOT collected on Anchor Systems. You can learn more about Anchor Systems here.
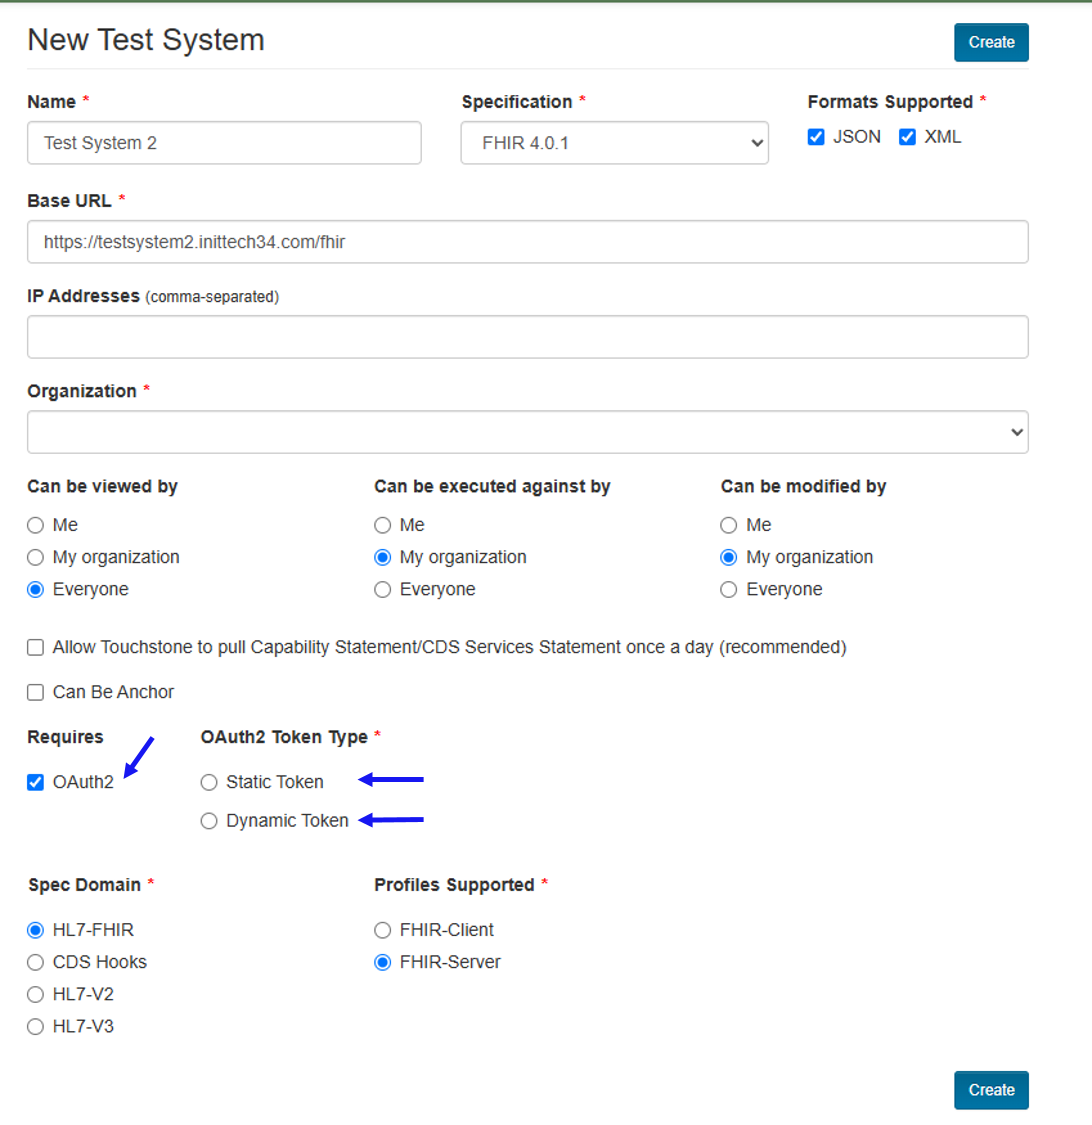
Requires / OAuth2 – Leave this unchecked if your system is a client test system only or if it does not require OAuth2. Otherwise, choose whether this system uses a static token or a dynamic token. If Static Token is chosen,
Authorizationrequest header will be set to this value by Touchstone when your test system is the target of an interaction.Spec Domain – Choose which type of test system you are creating, one that utilizes
HL7-FHIR, or one that utilizesCDS Hooks.Profiles Supported – If your test system only responds to requests and does not initiate message exchanges to other test systems, then select the
Serveroption.Message Protocols – For
HL7-V2andHL7-V3test systems, you have the option to designate what type of message protocols the test system is designed to use. ForHL7-V2,HTTP/HTTPSandMLLP V1are available, and forHL7-V3,HTTP/HTTPSandSOAPare available.HL7-FHIRandCDS Hooksdo not have these options becuase they areHTTP/HTTPSonly.
Note
While the options are there for SOAP and HTTP/HTTPS in the Message Protocols, at this time Touchstone does not support HL7-V2 HTTP/HTTPS and HL7-V3 SOAP, but will in the future.
To enable OAuth, check the OAuth2 checkbox and choose whether this system uses a static token or a dynamic token:
Note
Touchstone is currently not designed to use OAuth2 with Test Systems that support HL7-V2 and HL7-V3.
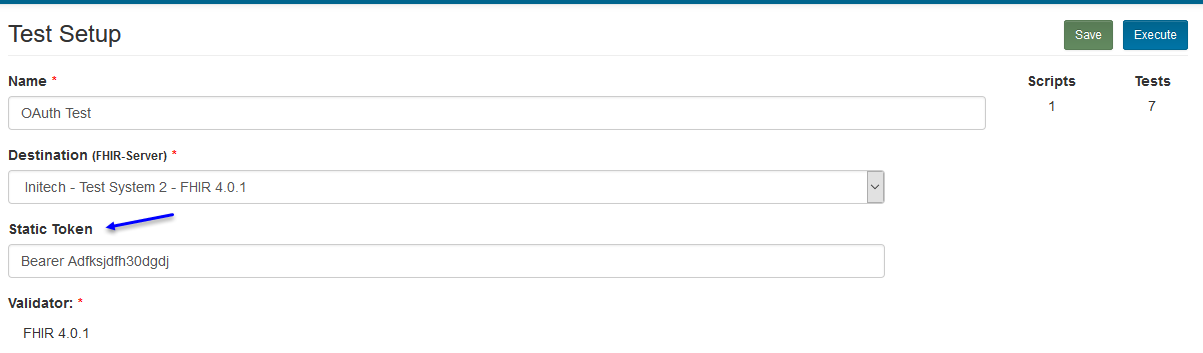
If the Static Token button is checked, a default value for the static token is required, but the value can be overridden at Test Setup if needed.
If the Dynamic Token button is checked, the following is shown to the user:
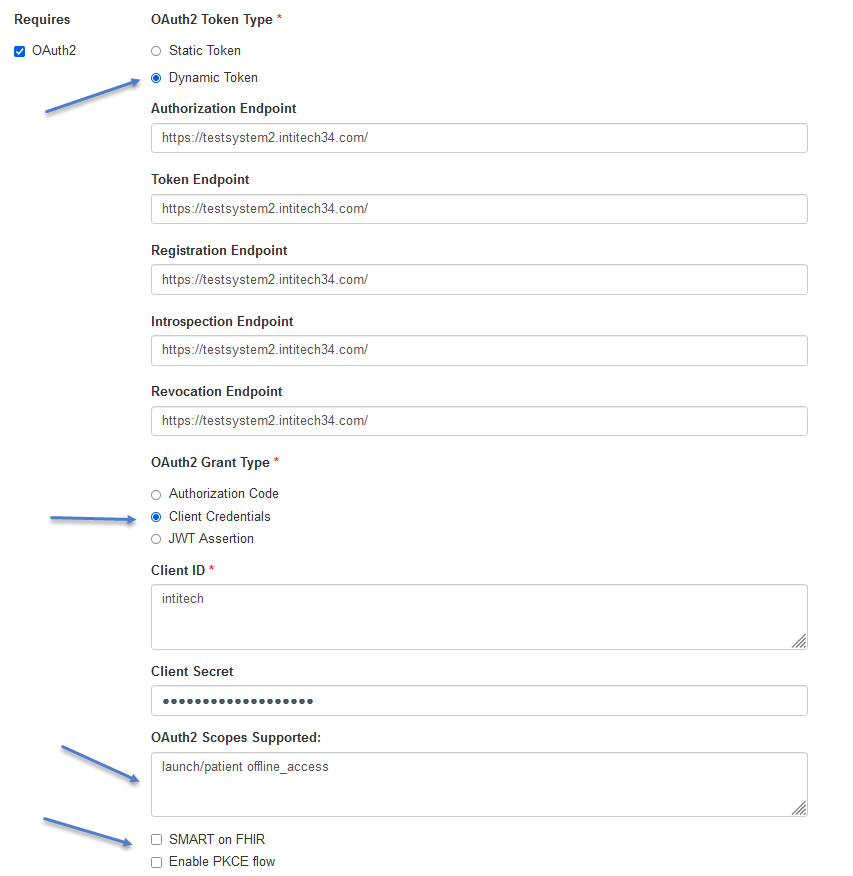
Authorization Endpoint – The authorization endpoint URL of the FHIR Server.
Token Endpoint – The token endpoint URL of the FHIR Server.
Registration Endpoint – The registration endpoint URL of the FHIR Server.
Introspection Endpoint – The introspection endpoint URL of the FHIR Server.
Revocation Endpoint – The revocation endpoint URL of the FHIR Server.
OAuth2 Grant Type – The grant type used for the server, Authorization Code, Client Credentials, or JWT Assertion. Choosing one of these is required.
Client ID / Client Secret – For Authorization Code, Client Credentials, and JWT Assertion grant type, Client ID is requried.
OAuth2 Scopes Supported – Optional input of the OAuth2 scopes that are supported.
SMART on FHIR – Whether or not the Test System supports SMART on FHIR. If this box is checked, then the URL endpoints will be overwritten if a FHIR CapabilityStatement is retrieved from the server.
Enable PKCE flow – This checkbox allows Touchstone to recognize the need for code_challenge and code_verifier parameters and use them in automatic authorization requests per PKCE (Proof Key for Code Exchange) specification
If Authorization Code is selected, the following is shown to the user:
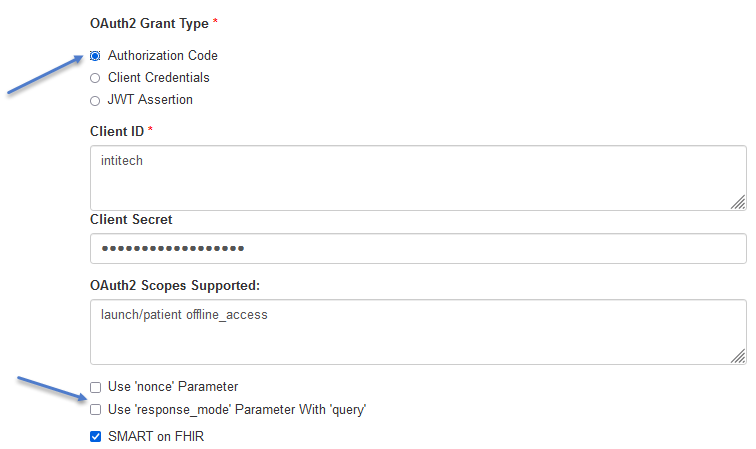
‘nonce’ Parameter – The ‘nonce’ parameter is sent in the Authorization Request with a randomly generated 12 character value.
‘response_mode’ Parameter – The ‘response_mode’ parameter is sent in the Authorization Request with a value of “query”.
If JWT Assertion is selected, the following is shown to the user:
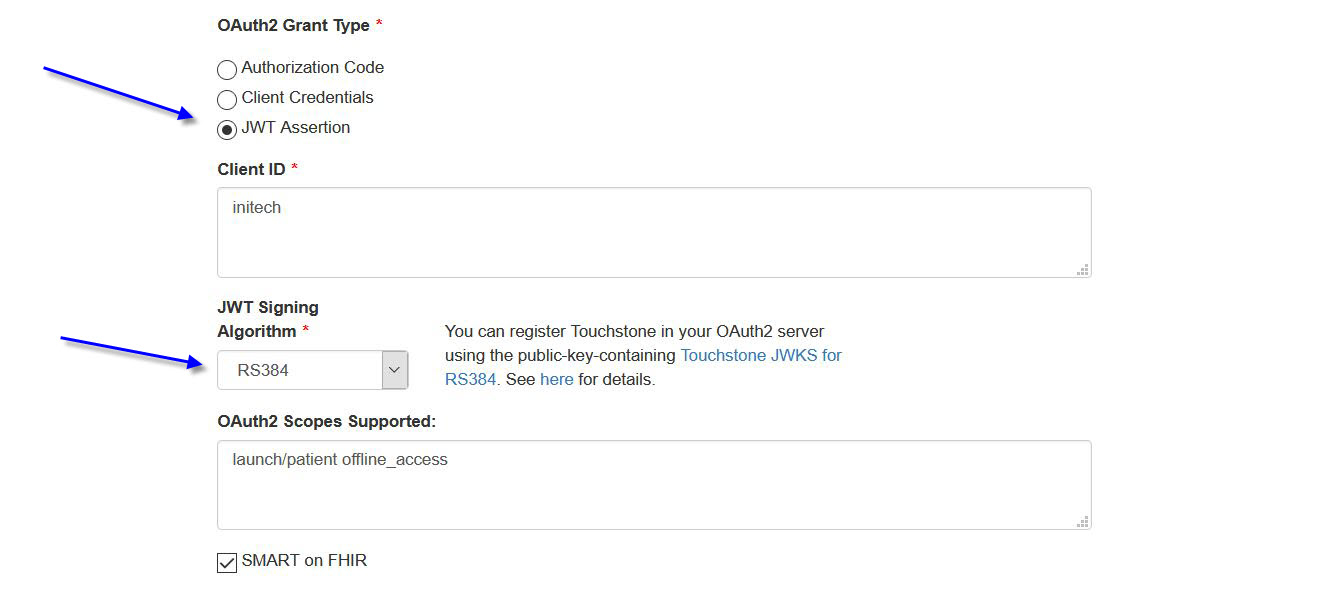
JWT Signing Algorithm – Algorithm used to sign or encrypt the JSON Web Token. Required for JWT Assertion.
For detailed information on setting up your Test System with JWKS please refer to the SMART App Launch documentation here.
Note: The Touchstone public-key can be found using the link next to the JWT Signing Algorithm. Be sure to select the correct algorithm before navagating this link.
To enable selection of your test system as the Origin (or ‘source’) of message exchanges in Test Setup, select the
Clientoption for Profiles Supported: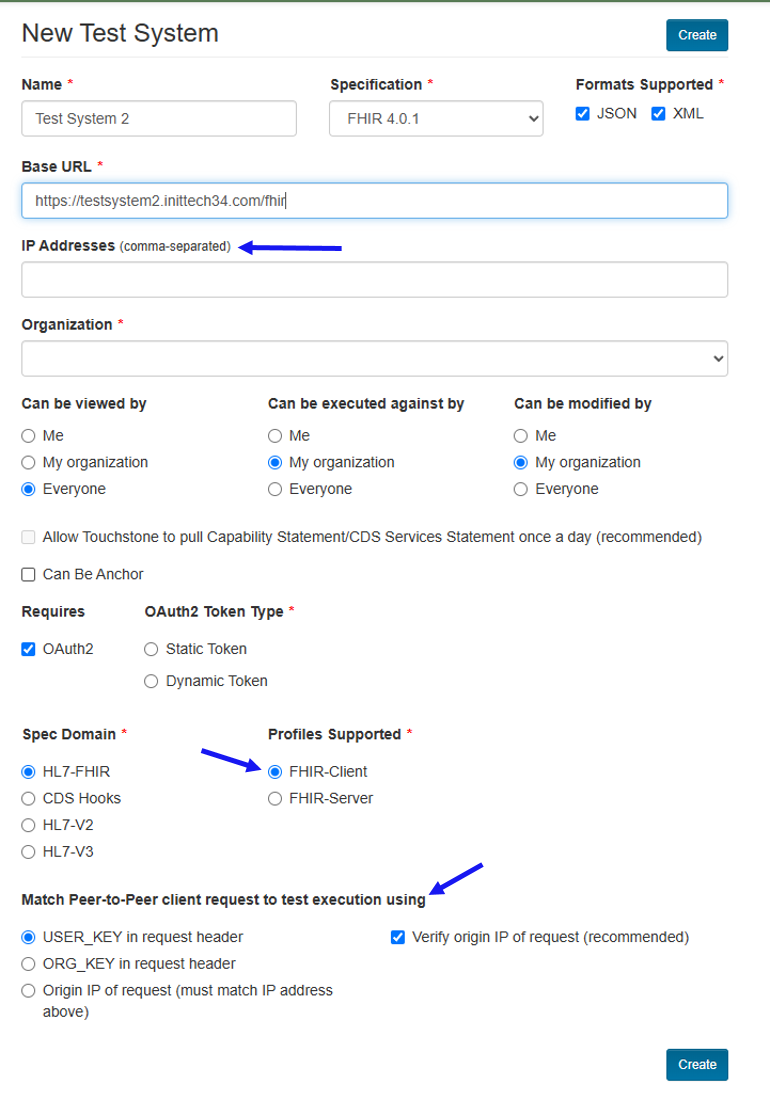
Match Peer-to-Peer client request to test execution using – This is the mechanism by which Touchstone will match peer-to-peer request messages to test executions. Peer-to-peer message exchanges are covered under Peer-to-Peering testing.
Verify origin IP of request – If checked, Touchstone will verify that the origin IP address of the request in peer-to-peer exchanges matches the client test system’s IP address in Test Setup. Without this verification, other client test systems could pretend to be this test system.
IP Addresses – This becomes critical if you have selected
Origin IP of requestforMatch Peer-to-Peer. It’s also critical if you have checkedVerify origin IP of request.Requires / OAuth2 – Leave this unchecked if your system is a client test system only.
Allow Touchstone to pull capability statement once a day – It is still recommended to have this checked even if the test system is a client system only. Capability statement is applicable to client test systems as well. See Rest Mode.
On the Edit Test System page, you can download the Capability Statement that is on your test server if you have one, or you can manually upload one to Touchstone:
